Today I’m sharing a Photoshop tutorial that I think all bloggers should be familiar with. In this clipping mask tutorial, you’ll learn how to create custom photo layouts as well as some pretty cool typography. Both of these things can be useful in creating blog posts and designs that look professional, cohesive, and unique. This tutorial is as easy as they come, so I think you’ll enjoy it! If you don’t have Photoshop, you can download a free trial on their website, which actually allows you to try out ALL Adobe software. Pretty sweet!
Since I’m covering two ways that you can use clipping masks today (photo layouts and typography), this tutorial will be divided into two parts. Now, let’s get crack-a-lackin’.
Tutorial One: Using Clipping Masks for Typography
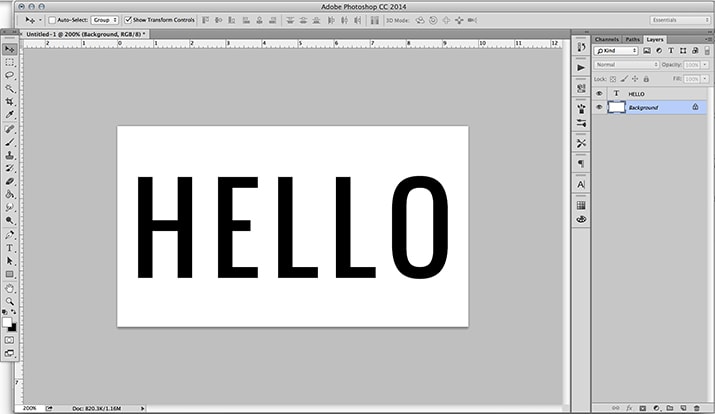
Step One: Create a new document in Photoshop. If your document is going to be used on the web, I recommend setting the resolution to “72.” Next, type out your word(s). I chose “HELLO” to keep things simple, but you could also use this tutorial for blog headers, as text to lay on top of photos in posts, etc!
Step Two: Create a new layer ON TOP OF your text layer. You can create a new layer either by going to Layer >> New >> Layer (in the top menu) OR by clicking the thing that looks like a piece of paper next to the trash can in the bottom right of your layers panel. Your new layer will be blank (white). Then, you can draw whatever you want in that new layer. I chose to draw some colorful scribbles using the brush tool.

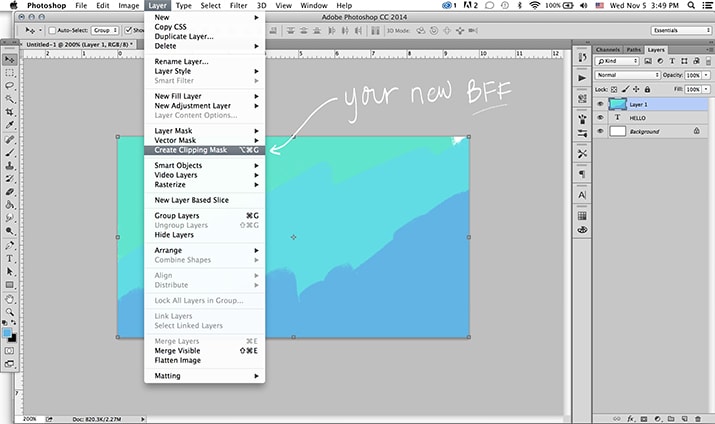
Step Three: Make sure your new layer is highlighted in the layers panel (like mine is). Then, go to Layer >> Create Clipping Mask. A shortcut is to hover between your two layers (in the layers panel) with your cursor while holding down the option key (on a Mac). You’ll see a little arrow pop up and when you click, it will create a clipping mask.
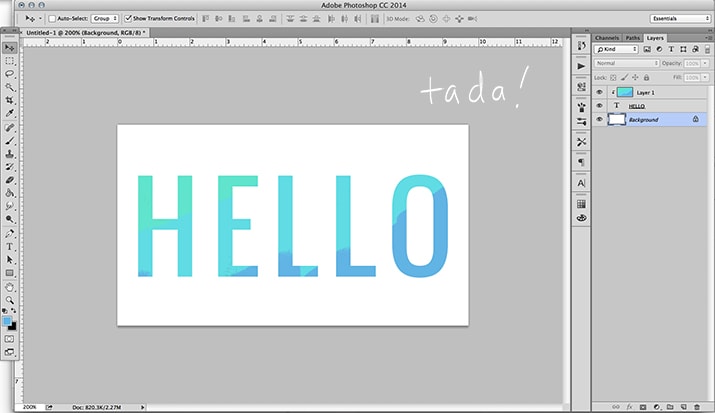
Step Four: Admire your badass work.
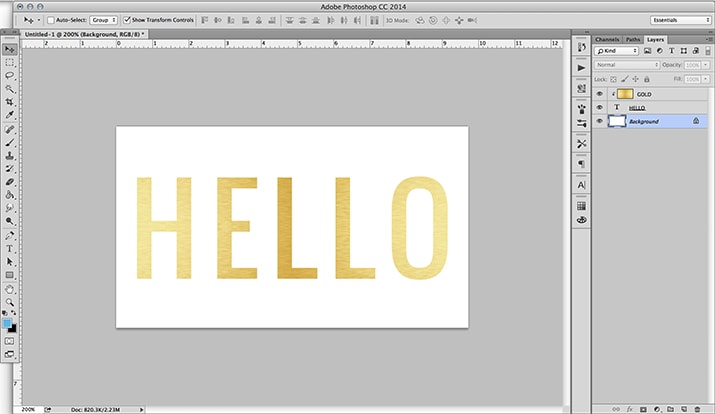
Alternatively, instead of creating a new layer in step two, you could drag a photo or another graphic on top of your text (just make sure it’s on top of your text in the layers panel). In the example below, I dragged a shiny gold image into my document. Then, when you create a clipping mask, your words will take on the effect of the image you’re using, which makes my words look gold!
Tutorial Two: Using Clipping Masks for Custom Photo Layouts
In this tutorial, you’ll learn how to make a custom photo layout. I’ll show you how to make a grid with four square images, but you can easily use this tutorial to create round images, grids with more images, etc.
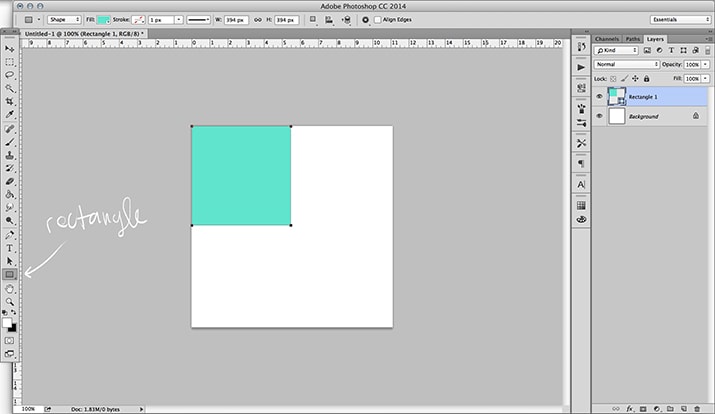
Step One: Use the rectangle tool (in your toolbar on the left) to create a square. It doesn’t matter what color it is.
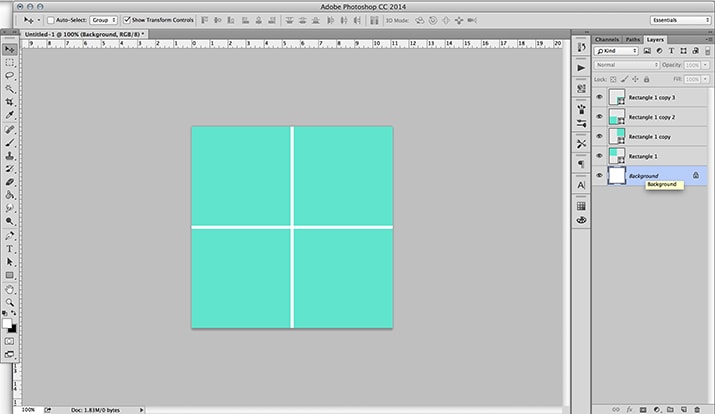
Step Two: Create three more squares. An easy way to do this? Right-click your first rectangle layer and then click “Duplicate Layer.” This will create an exact copy of your square, which you can then drag next to your original square. Then, you can highlight the first two (in the layers panel on the right) and click “Duplicate Layer” again and drag those two new copies to the bottom, so that you now have four squares of equal proportion and in the same alignment.
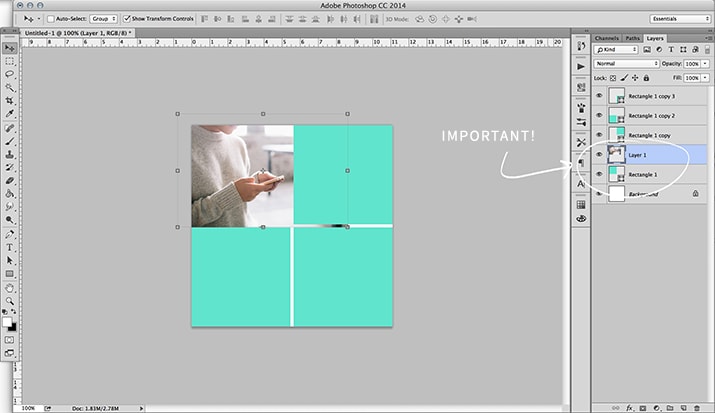
Step Three: Drag a photo or image into your document. This photo will take on the shape of the square that it sits ABOVE in the layers panel. The image below is important, because you’ll notice that my image is above the top left square in my layers panel AND it’s on top of that square in the actual document.
Then, same as the first tutorial, go to Layer >> Create Clipping Mask. You must select the TOP layer (i.e. the photo you want to trim) when creating the clipping mask. A shortcut, as mentioned above, is to hover between your two layers (in the layers panel) with your cursor while holding down the option key (on a Mac). You’ll see a little arrow pop up and when you click, it will create a clipping mask. The image should then be cut to take on the dimensions of the square. Want to move your image? Just drag the photo layer around until you get it into a position you like.
Step Four: Do the same thing to all of your other squares until you’ve created your layout. I often create layouts like this and then save them as templates on my computer, so that I can reuse them for future blog posts. You can see an example of a blog post I recently did where I used a clipping mask to easily create 20 photo layouts.

Make sense? I sure hope so! Let me know if you have any questions below. 🙂 If you end up making something with this tutorial, I’d LOVE to see it! And if you found this helpful, I’d kind of love you if you pinned it. 🙂
p.s. How to Create a Hand-Lettered Blog Header (No Scanner Needed!)